In the past, I had resisted the urge to buy all things Apple. While I have a lot of the Apple product line, I never bought into Apple TV. It seemed expensive for what I was getting, and I didn't watch much digital content.
However, when Steve Jobs introduced the latest version of Apple TV the timing was perfect. The week prior to Apple TV being announced, I got a horrible cold. I ended up at home for about 5 days and was just miserable. Luckily, I had my trusty iPad and had just read about Netflix app. I used to use Netflix, but has dropped it a few years ago. I just didn't get through the DVDs fast enough, so I cancelled it. However, now that they were going to deliver content to my iPad, Laptop, or iPhone, I figured I would give their one-month free trail a test. After all, I was sick at home and daytime TV is not my thing. So I gave it a try and was blown away with the quality and speed of how quickly the movie or TV shows starts.
Then Apple TV comes out, and now that I have Netflix again it just seemed like a great idea. So I ordered one. Once it arrived, it took about 10 minutes to get set up. Typical Apple approach to things, keep it simple!
Overall, I'm very happy with Apple TV. We've watched a couple of movies and they worked well. They looked good on our 46" LCD screen, the sound was great coming out of the surround sound system, and I was even able to easily program my Harmony Remote to work with my Apple TV.
This is a perfect experience though. Apple TV did have to buffer and stalled out. After a minute or so, the movie started back up. That was a little disappointing. The other big issue is that no TV shows in Netflix will play. They buffer for a while, begin playing, and then stop after about 5 seconds and return to the main show page in Netflix. From what I've tested, this is an issue with Apple TV. I can watch movies and TV shows on my iPad and laptop with now buffering issues or pauses. Everything is coming over the same network, so it's not a network issue either. I've found a few support thread on the Apple site, but no solutions have come up. The software is up-to-date, so that's not it either. If anyone has any ideas, please share.
Tuesday, October 19, 2010
Thursday, September 23, 2010
Mossberg ditched his laptop for an iPad while traveling
Walt Mossberg, from The Wall Street Journal, decided to leave his laptop at home and travel to Paris with an iPad. This was a week-long working vacation and he posted an assessment of his experience with the iPad.
Interestingly, I have just run into one of the issues Mr. Mossberg mentioned while using my iPad. I have a number of PDF documents that I've "marked-up" with highlighting and comments, etc. I really like doing this rather than printing everything out. By marking up a PDF or even a Word document, I don't have to waste the paper, I can store it in Dropbox and have access from basically anywhere, and the mark-ups are dated and legible (sadly, I can't read my own writing) and much more functional for my uses. I spent the better part of an afternoon looking at reviews and trying different iPad apps to find one that will let me see the mark-ups. I found some that would allow me to mark-up a document (even though they didn't allow for use beyond the iPad, no exporting, etc). However, I didn't find anything that would let me see mark-ups I'd made previously with Adobe Acrobat.
As for Mr. Mossberg's mention of Ping from within iTunes, I haven't tried that yet, and I'm guessing if it isn't available, it will be soon in the iOS 4.2 update coming in Nov! This is one of the few issues I've found with my iPad so far.
Friday, September 17, 2010
Teaching with iPads: BlogPress for iPad
Teaching with iPads: BlogPress for iPad: "There are a lot of ways to manage a blog with an iPad. You can use Safari just like you would on your desktop or laptop. Of course, there ar..."
Thursday, July 22, 2010
ProfCast

ProfCast records your voice as you move through your presentation and syncs your voice to each slide. It does all the hard work, you just have to give your presentation sitting at your computer. There are a couple of things to note about ProfCast.
Enhanced podcasts use only still images. So all those fancy transitions and fly-ins and things will not appear. ProfCast will simply ignore them and use an image of your slide in its final state after eveything has flown in and appeared.While this may seem like a limitation, it is actually a blessing for two reasons. First, the still images are nice and small and help keep the file size of your podcasts down. Second, since ProfCast simply ignores the motion and transitions, you don't need to maintain a different presentation for recording versus a live setting. Make one presentation and use it for both live and podcasting situations.
On important instructional feature that is used in both PowerPoint and KeyNote is the built list. This is when one bullet point appears, then you can click the mouse button or arrow key and the next bullet point appears. From an instructional standpoint, this is a great tool. It allows you to keep your audience from "reading ahead." ProfCast can make this happen, but there are a couple of strings. I'll explain them below based on the platform you might use.
Windows Users:
If you are using Windows, you will be using PowerPoint and ProfCast will automatically make a built list appear as it does when you are presenting.
Mac Users:
If you are using KeyNote, ProfCast will make your built lists appear just like they do when presenting. However, if you are using PowerPoint on a Mac, ProfCast will not be able to do this automatically. There is some issue that cannot be resolved between PowerPoint (or Microsoft) and ProfCast for Mac. Fear not, there is a way to make this work, it just takes a little planning at the beginning.
If you are using PowerPoint on a Mac and want to use built lists in your ProfCast, here is the way to make it work. For the purposes of this posting, let's assume we have 3 bullet points we want to list on a slide. The trick is, we use three slides. Slide 1 has the first bullet point. Duplicate slide 1 to make slide 2. On Slide 2, add the second bullet point. Now duplicate slide 2 and create slide 3. Then add the third bullet point to slide 3. This way slide 1 has the first bullet, slide 2 has the first and second bullets, and slide 3 has all three bullets. When you give the presentation, your audience will not know the difference. ProfCast won't know the difference either, and it will appear that you have a 3 bullet point list that builds on one slide.
ProfCast is available for both Mac and Windows and costs as little as $15 with the educational discount. Even the retail price is as low as $30-$60 (currently ProfCast is running a special pricing offer for $30). Pair ProfCast with a high quality microphone like the Blue mics discussed in the previous posting, and you have a great tool for creating enhanced podcasts of lectures and presentations.
TextWrangler
If you are like many people when you read the following term, your eyes will glaze over and you'll get very sleepy. The term is text editor. OK....wake up, there is something for everyone here. It is often assumed that text editors are only for the true geeks of the world and unless you write code or do server admintration, you have no need for these silly applications.
I'm here to tell you a different story about text editors, specifically TextWrangler by Bare Bones Software. In all honesty, yes text editors are great tools for geeks and they do come in really handy when we write code or administer servers. However, they can be a really handy tool at times.
What happens when you try to open a Word document and it's corrupted. Word won't open it and you don't have a backup. You can also open TextWrangler and then open your Word document. Rather than the gibberish that had appeared when you tried to open your word document, you'll likely see the text of your document. the formatting will be gone, but the text will be there, and you can copy and paste it into a new Word document and reformat the content. That alone makes having this free tool worthy of the small amount of space it takes up on your hard drive.
iPhoto Library Manager
 If you're a Mac user, you likely take a lot of photos and rely heavily on iPhoto. iPhoto is a great tool for managing and editing your digital photos. However, as more and more of us are taking more and more photos, we are quickly discovering there are some issues over time. For example, I take around 5,000 photos a year. Yes, I like to take a lot of photos. I do my best to keep them all organized using iPhoto events, keywords and smart albums. However, my iPhoto library eventually began to take over my hard drive. I had a 38 GB iPhoto library and there was no end in sight. So I had a couple of options:
 - delete a bunch of photos
- back up a bunch of photos to DVDs
- take fewer photos
- look for a way to split my iPhoto library into multiple libraries
iPhoto Library Manager allowed me to split my current iPhoto library into multiple smaller libraries. Of course, this still didn't solve my hard drive space issue. I needed a plan. So after some thought, I came up with a plan of how I wanted to organize my photos. At the beginning of each year, I create a new library for that year and move the library from 2 years ago to external drives. I also maintain a library of my favorite photos. I now have 3 iPhoto libraries on my hard drive:
- the current year
- the previous year
- my favorite photos
So why not just use iPhoto and change the library in the preferences? Simple, iPhoto Library Manager does some other things that make it completely indispensable. It not only manages all the different libraries, it also lets me move/copy albums or photos between libraries, merge libraries, split libraries and more. The application just streamlines the who process in a nice simple interface that keeps all my metadata (iPhoto keywords, edits, etc.) in place as I move photos.
Fat Cat Software offers another application the does basically the same thing for iTunes. It's a really handy application for splitting up your iTunes library. If you have a lot of iTunes content, you might want to check out PowerTunes from Fat Cat Software as well.
Monday, July 19, 2010
Blue USB Mics
As podcasting continues to gain popularity, recording quality is becoming more and more important. Most laptops come with a built-in microphone, as do many desktops these days. However, the quality of built-in mics can vary greatly from one computer to the next. External mics often provide much higher quality recording levels. Many companies now produce USB mics. The benefit of USB mics is in most cases you can simply plug them into your USB port and your computer will recognize the mic without a special sound card or software.
Blue Microphones has a been making superb mics since 1995. Many professional recording artists and studios use Blue Mic exclusively. Blue also has a great line of USB mics that have become the gold standard for podcasting. Blue offers three different USB mics in their line up: Yeti, Snowball, and Snowflake.
Some basic mic terminology is needed to help understand the differences in micrphones. Cardioid mics pick up sounds coming from in front or from the sides of the mic. A cardioid mic doesn't pick up sound coming from the back of the mic. Omnidirectional mics on the other hand pick up sounds equally from all directions. Bidirectional mics pick up sounds from the front and back of the mic and ignore sounds coming from the sides.
 The Blue Yeti (shown on the right) provides the highest level of recording flexibility. The Yeti is THX certified and provides a level of clarity previously unheard of in USB mics. You can record using cardioid, omnidirectional, and bidirectional patterns. What this means is the Yeti can record an individual, a group of people, or a traditional interview setting with an interviewer and an interviewee. This types of situations used to take multiple mics to get good sound quality. The Yeti will cost about $150. This is a great mic for leaving at your office or home and using in a set place where you won't need to transport it much.
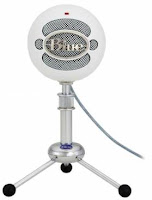 The Blue Snowball (shown on the left) is the next in the line up. The Snowball is a cardioid or omnidirectional mic. It also offers a -10dB pad to help control loud environments or loud speaking individuals. The Snowball also is a bit more rugged than the Yeti making even more flexible and transportable.The Snowball will cost you around $99.
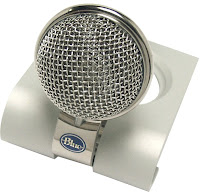 The Blue Snowflake (shown on the right) combines high quality recording with the ultimate in portability. The Snowflake is a cardioid mic with great quality. The case works as a stand or can hang on the screen of your laptop. The Snowflake is great for Skype, recording lectures, podcasting on the go, or even dictation. The $59 price tag and high quality recording makes the Snowflake a very popular mic.
Blue Microphones has a been making superb mics since 1995. Many professional recording artists and studios use Blue Mic exclusively. Blue also has a great line of USB mics that have become the gold standard for podcasting. Blue offers three different USB mics in their line up: Yeti, Snowball, and Snowflake.
Some basic mic terminology is needed to help understand the differences in micrphones. Cardioid mics pick up sounds coming from in front or from the sides of the mic. A cardioid mic doesn't pick up sound coming from the back of the mic. Omnidirectional mics on the other hand pick up sounds equally from all directions. Bidirectional mics pick up sounds from the front and back of the mic and ignore sounds coming from the sides.

 The Blue Snowball (shown on the left) is the next in the line up. The Snowball is a cardioid or omnidirectional mic. It also offers a -10dB pad to help control loud environments or loud speaking individuals. The Snowball also is a bit more rugged than the Yeti making even more flexible and transportable.The Snowball will cost you around $99.
 The Blue Snowflake (shown on the right) combines high quality recording with the ultimate in portability. The Snowflake is a cardioid mic with great quality. The case works as a stand or can hang on the screen of your laptop. The Snowflake is great for Skype, recording lectures, podcasting on the go, or even dictation. The $59 price tag and high quality recording makes the Snowflake a very popular mic.
Subscribe to:
Posts (Atom)